Saturday, December 14, 2013

Holy cow I hadn't realized how long it had been since I've updated! Well the IronMan 4x4 front bumper and 10K winch has been installed and wiring almost finished up. Pretty happy how it came out and the install was pretty straight forward. I also lined the rig in Al's liner this past July and now that the test areas about how the liner would take John Deer Blitz black I'm just waiting for warmer weather to shoot it.

A couple weeks ago I was out at the barn and a guy who rented space for his trailer who hadn't paid in months finally came to pick it up.  When I pulled in he was running about 40' of straps to his conversion van to the trailer tounge and was about to attempt to pull it 90 degrees thru a gate. Knowing that this wouldn't work I immediate offered to tow it up to solid ground, my mistake for being a nice guy.

He was supposed to be spotting me in the tall grass and obviously wasn't paying attention or didn't care, guessing the latter, as he failed to point out some fence wire that had got caught on the rear part of the exhaust. As I continued backwards the tire caught the wire and proceeded to bend the bosal down and pinch it right at the top of the rear diff......AAAAAAAAAAAAAAAAAAAARG!

So after getting it out for him I offered to fire up my compressor and air up a flat tire on each side and top off the ones that looked like they had air, only to have him chide my old beast of a compressor.
Not even an appreciated thank-you as he left or offer to help me sawzall the muffler off at the pinch, what a douchebag.

Anyhow I had bought the rear most part a while back off another Ih8mud member so I thought in an easy job to do but after further investigation realized it wouldn't be so easy. I needed a gasket and three new mounts, off to Beno to order. The job should have been fairly straight forward, replace rear part and install new gasket and mounts, or so it would seem.

After I got the rest of the old rear off I noticed that the old gasket had not come all the way out, this lead to several hours with small drifts and chisels to clean out the recess in which the new gasket sat.
With that done I started to see how everything was going to line up with the new mounts, it was about an inch off before the main muffler, 2 inches past the main, and nearly 3 at the bosal rear mount.
Several more hours after jacking and bending it was close enough to line back up properly.

The next morning my alternator started the "I'm dying replace me soon" by flashing the low volts light on the dash several times on a cold start before going away but over the week the length of time it would stay one just got longer.

Pricing out a cheap chinacom alternator was around $150, not my first choice, a factory was north of $400, not really a second choice, so back to Ih8mud.com to search the forums. Found Photoman Bill had been making a kit that allowed a 03-07 Sequoia alternator to be used for $90, found used factory alternator off ebay for $80, new brush kit from Beno $20, parts ordered.

Now why would you do that you ask? Well the stock alternator on the 80's are underpowered IMHO, the Sequoia puts out nearly double the power, 150 amps worth to be exact. With the dual batteries, winch, 2000+ watts of amps it just made sense to go this way seeing that it was a Denso and not a chinacom refurb and at nearly the same cost.

That install was actually straight forward, Bill's instructions were flawless and the entire thing from beginning to end was about 3 hours.

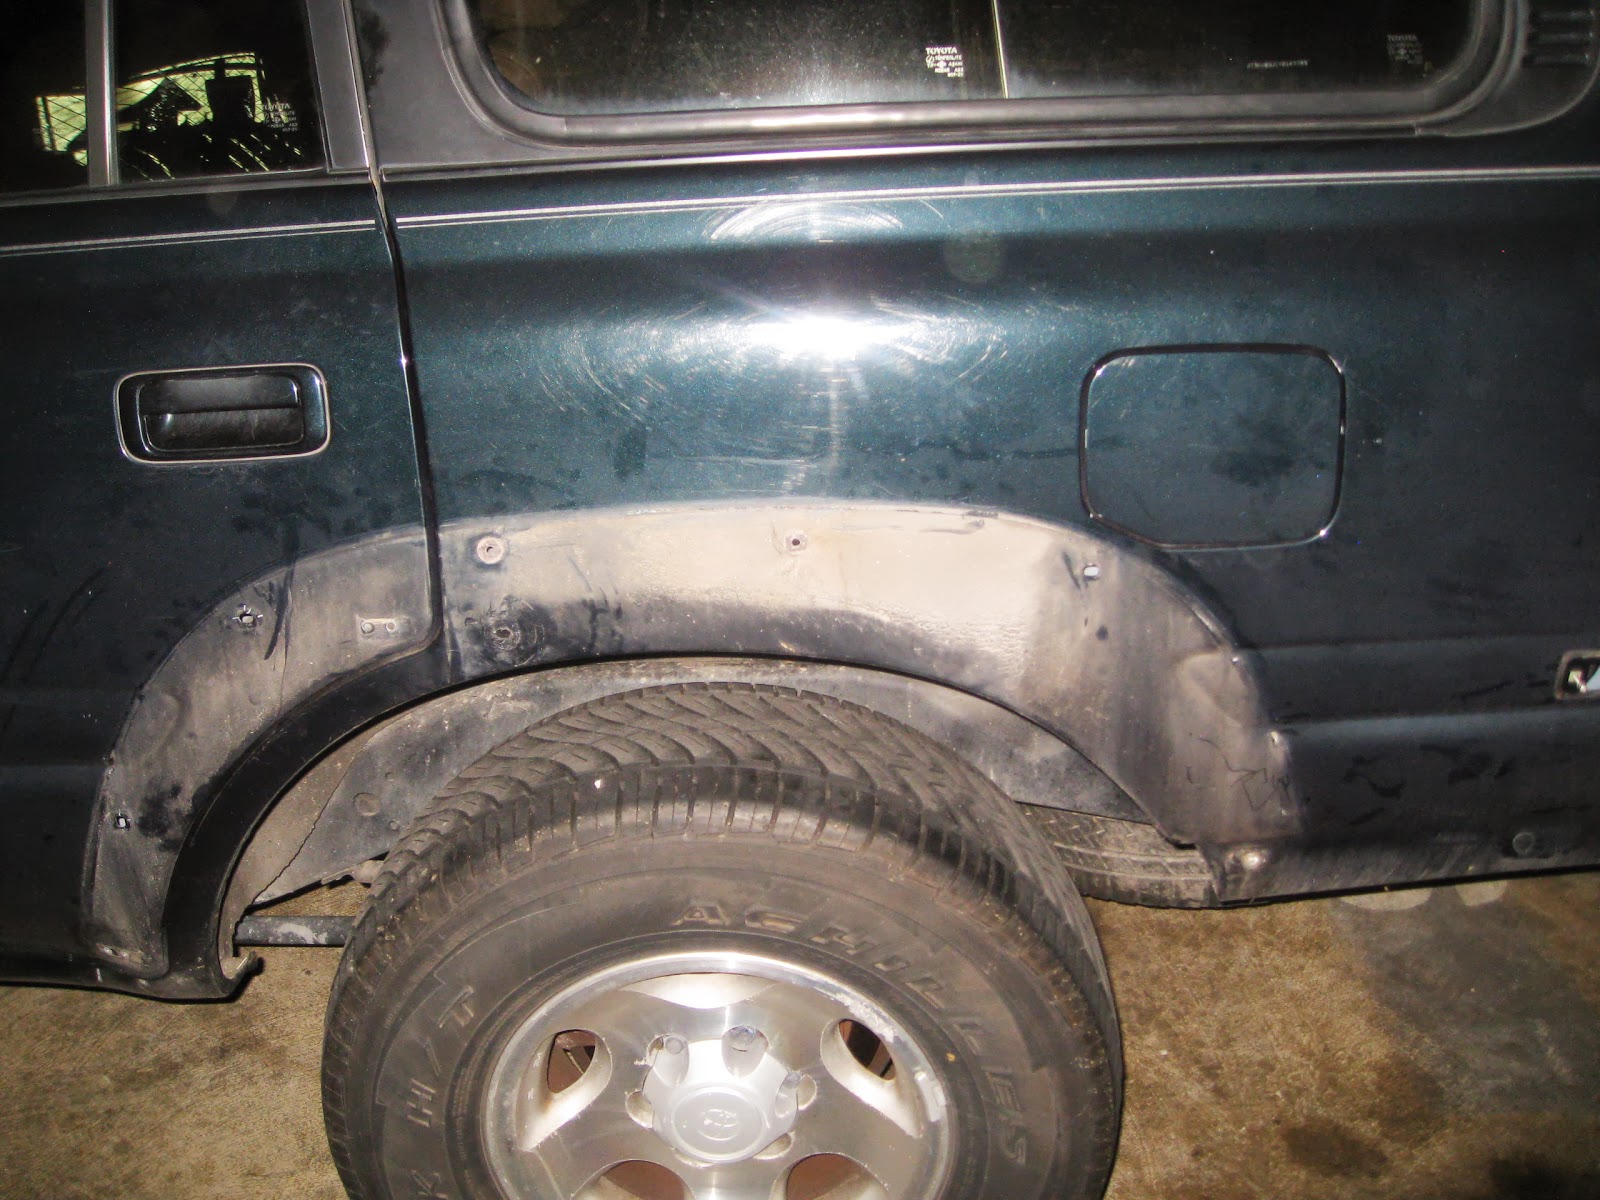
Here are some pictures in prep for the liner, removing the fender flares.


The grinder and pads worked like a champ


 Once the surface was roughed up enough it was time to shoot it with some etching primer


Roof rack hole solution simple, plastic plugs and rtv


 Bumper finally installed the day after I lined it


 I did some test areas with JD Blitz black and after 6 months it's holding well so I'm going to shoot the entire rig as soon as I get a warm day.

Bills Kit
 Pick of main bracket installed
 Have to wiggle the belts on if you're using the stock LC pulley

 Old brushes from the stock on left to the Sequoia on the right.

I hope to have an IPOR rear bumper by end of January and will then begin the OME springs and be ready for 285's. Currently working on the rear door system and trying to button of the rear interior.

Tuesday, May 7, 2013

OK so it's been a long while since I posted but I've done a ton or work since the last update. The new leather kit from metrictlc.com is in and I must say Shane's stuff is incredible I opted to do the seat heaters as well and use some LS400 switches in Oak for that factory look. The interior is 90% complete, only waiting on time to finish the rear Hardigg case pullout drawer before snapping it back together.

After my last post about replacing the water pump/thermostat my radiator decided to split at the top so that whole mess was rather quite invovled. Since the radiator was to be pulled it was time to do the distibutor o-ring/ the oil pump cover o-ring and the front main oil seal and I must tell you it's a hellova job but since I was going to have the room and the parts were cheap it was time to just do it.

I opted for a $100 aluminum radiator from Sheppard Auto, its for a 91-94 and takes a slight bit of modding but fits and works and MUCH cheaper than any other alternative I found.
The top mounts took some flat bar to adapt to the stock shroud because I didn't feel like taking the risk of cutting or welding into a new radiator. 

What chapped my ass was the fact I had done the water pump earlier and afterwards did the dual battery install, now all that work had to be undone for the most part to complete this job.

Turkey pans at the dollar store 2 for a buck!
Time to drain start removal and degrease. A bad o-ring and oil pump cover gasket can make some serious grime.

I spent hours degreasing, scraping, brushing, the amount grime was unreal as you can tell by the pictures below. It's a dirty and nasty job without the aid of a pressure washer or steamer but you gotta do it while you're in there and before you can start to break anything apart.


Picture on the left you can see where oil seeps, on the right with distrib removed you can really see the oil trail. Belopw is the disributor cleaned and shows how bad the old ring was, literally I had to crack it off it was no longer plyable and felt like hard plastic.


Once I started stage one of the clean up things progressed pretty well, 3 cans of degreaser were used the pans came in handy to catch most of the crud and grimey water and sawdust absorbed everything else.
 Shot of the underside, literally caked on oil crud. Went thru I don't know how many nylon brushes during this nasty process but well worth getting it done now, I guess!


Ok so here we are before crank pulley removal, things are looking much better than they started hours ago, or that's what I thought until the pulley came off. To the right is a picture of the jig I made to get the crank pulley off, if you're in need drop me a line and I'll let you borrow it, very handy!
 
Jig in place.


I could have done the "bump" method but that doesn't allow me to get it back on and I'm leary of bumping alone. Suffice to say that crank bolt is ON THERE tight, it has to be since the oil pump is friction driven, if it aint tight oil aint flowing and then you have some serious problems!


With the crank pulley out it was time to do some more cleaning and pull the main seal and the oil pump cover on the left. I heard nightmares on IH8MUD.COM about the cover screws stripping, breaking and all kinds of ways to get them out, mine came out without issue it was the main seal that gave me a fit. I opted to replace the pump cover screws with torx from a forum member. 

So during the lower seal replacements I didn't get photos, I was totally engrossed in the work and focused on getting it done. Since I was this deep into the project I opted to removed the PHH and go 100% silicone hoses. I removed the hard pipe that runs behind the motor to where you find that pesky heater hose and used an entire run of hose to replace. This time I also opted to replace ALL radiator hoses too, found Gates at Car Quest for under $25 and the hose came off ebay, 10' for $30 delivered and it is some THICK stuff, my mind rests easy now that this is done.

Flushing the system was more of a hassle than I ever imagined it would be to get a somewhat clear flush, I ended up hooking up a hose and pushing water thru the upper radiator pipe and then thru the firewall and again thru the PHH, what a PAIN IN THE A$$ it was. Finally I was ready to contemplate the radiator install!! Overall this process was pretty straight forwared, rather than tapping a hole for the head pressure relief hose I opted to buy a 45degree 1.5" copper elbow at home depot, tap and JB weld that and then splice it into the top hose as seen below. To reinstall the crank pulley I used the jig again and bought a 3/4" torque wrench and socket set from Harbor Freight for $60

So far 5K miles without an issue, I'll update soon when I find my other camera with the after pictures, in the mean time you can find the entire album, or the bulk of it here

Since this job I've added Pfrans LED's, drained the Tcase and both diffs and went synthetic, Depot headlights with clear turns and parking and wired for the disco mod with LED's in the parking lights so they blink orange when the turns are on but glow white otherwise. Still laying in the garage is a Ironman 4x4 with an Engo 10K winch, I hope to line in the next few weeks and install those.


Tuesday, October 23, 2012


I won't bore you with the ripping out of the aux heater other than it is a HUGE PITA, I had almost decided against it but seeing all the possible points of failure that could make a roadside "get you by repair" impossible I'm glad I did rip it out. Its definitely not easy, takes a lot of time, cussing, and patience to accomplish.The new water pump and thermostat were pretty straight forward so I won't bore you with that either. Fabbed a quick plate for the hole, tacked it in and sealed it shut on both sides.

Well this project started simple like most of my projects do and then quickly snowballed and morphed into things I couldn't have perceived no matter how much I planned ahead or how many hours I spent on Ih8mud.com!

To start I acquired the 1996 294a 80 series Land Cruiser from my daughter who had it just over 4 years. Shortly after she bought it I moved to Maryland from Florida for a job so I was unable to help her with repairs and maintenance. The last year she had it she was plagued with several problems, these included a dead battery, the pesky heater hose blowing, leaking birfs, and anti-lock brakes that sometimes caused a hard pull to the left, this was to be her final "I'm done with it" and she wanted it gone and refused to drive it any longer.

I don't blame her, with gas prices they way they were and 13MPG at best I agreed with her and told her I'd help her sell it. She used her own money to buy it even though I had originally cautioned against it and had taken care of it pretty well but it was time for her to find something more economical and in her mind dependable. Since it had the pulling issue she didn't feel right selling it, she feared that if she did and something bad happened the buyer would come back and blame her. I agreed to fly down, redo the front brakes and drive it back to MD to sell it there. Being a Florida truck that was completely rust free I thought I could get her more $ here for it and she wouldn't have to worry about it coming back to haunt her.

I ordered a complete front end brake set, rotors, pads, and calipers and had it shipped to my parents house in Sarasota and spent 2 days getting it done, thanks Dad for letting me use the garage! The manual locking hubs were installed by the PO so they could tow it behind their motor home, my daughter had been running with them unlocked and I later found this to be the sporadic problem with it pulling hard to the left when braking. Since they've been locked I have never had the issue happen again so there must be something the ABS doesn't like about free spinning front hubs.
Three tanks of gas 19 hours later I was back in Maryland, something strange happened along the way though and now instead of selling the truck I wanted to buy it for myself!  It could have been the lack of sleep, the long drive, or who knows but I fell in love with it and wanted to keep it! I found out shortly after getting back it was a locked 294a which made it a keeper for sure, that alone sealed my decision to not look back and from that moment forward my wallet was to be emptied accordingly.

After fixing some odds and ends like rear hatch lock, rear door lock, window motor for drivers door and some other odds and ends like LED kits for the interior lights and ripping out the absolutely crappy alarm system and installing a simple keyless system I decided it was time to do the stereo. What I thought would be fairly straight forward project has mushroomed into a full fledged interior tear down and rebuild.

First it didn't make sense to do the complete stereo and amps until I did the dual battery install, it did make sense to do that until I did the water pump and thermostat as it would just be more stuff to work around. It didn't make sense to do the water pump and thermostat until the aux heater was ripped out and bypassed, see where this is going? This is how things snowball out of control!

So here we are a year later, I have a working stereo so that should tell you something, but getting to this point wasn't a cake walk and I have countless hours of time invested, if I were to guess easily over 100 hours, and tons of more hours left to complete. Most of my weekends over the last 6 months have been consumed by the LC and to be sure the rest of this years weekends will be too.

First the imcomplete album can be found here
This album is missing several photos but gives you a good idea of the scope of work, I'll work on documenting further after I'm done and can round up all the pictures.


Since it had a an OK Sony head unit in it already I decided to plug ahead with speakers and save there rest after the second battery install. I found one speaker in each of the doors and later two in the dash and two more in the rear headliner. I bought some cheap 5.25" Blaupunkts from ebay for $17 for the front doors and another pair of 4" $12 Blaupunkts for the rear doors, am I a cheap Dutchman? YES definitely! I try to spend my money like I salt my food, just enough to make it taste good, too much and it tasted like doodoo. 

For the dash I put in some 3.5" Polks, again $20 per pair off ebay and some Polk tweaters for the rear for $12. For the amps I bought a pair of Sony Xplod XM-GTX1302 which are 800W 2 channel amps that can run at 2-8ohms. Since each amp would be powering four 4 ohm speakers each they run at 170A. These amps were found on Sony's outlet site and I got the pair delivered for an amazing $120 for BOTH! Am I a cheap Dutchman or what?

So the speaker install was pretty simple but since I was to have the doors apart it made sense to lay down some 11101 dynomat first. For about 2 hours and $20 a door this is well worth it, the doors thud shut and you can really tell the difference, like it's night and day. Both sets of speakers were shallow mounts, neither were deeper than 1.75" and I didn't expect much from them other than to be better than what was there.
They sounded great with the Sony but I was chomping at the bit to see what they would sound like with some juice behind them, this is where the dual battery install came in. The key to dynamat is taking your time, making a template, having a good roller and heat gun. Start pealing the backing off about an inch from the top and work your way down, there is NO WAY you can put this on in one go so don't even try!


  The dual battery install was again fairly straight forward but just took time, the right tools, and materials. Since Blue Sea products are of high quality and reasonable cost it was a no brainer. I went with the Blue Sea add a battery kit and a Safety Hub 100 for just under $150 for both kits. All connections were soldered, I don't believe in crimping anything unless for a temporary repair and so I sourced all my #2-#8 eyes and connectors at DelCity which is a great one stop shopping place for all kinds of electrical goodies. The batteries were to be fused with mega blocks and DC breakers, these along with the #2 welding cable was to be sourced of ebay. I should have taken more pictures along the way of soldering the connectors etc but I was in get it done mode and it completely slipped my mind until I was done. All house power now comes off the intelligent switch on the firewall, you move the cable that comes off the starter and connect it to the switch as well. I tapped the small wire going to the starter for the SI so it can isolate when needed, if not it will not isolate the two batteries when needed.


So now that this was done it was time to start mounting some amps, the placement was under each front seat and I took some bolts and tacked them in upside down and that made for a great way to secure them to the floor. Before this was to happen I wanted to lay down some mat first. Dynamat had a product but I felt it was overpriced and decided to use Thermo-tec 14620 which was $40 for a roll of 5'-x3' took two rolls to get this done. You can see once again that your best tools will be a good roller and a heat gun, a good scissors and utility knife are also a must have. Starting to peel back a bit and stick it first is a good idea, in this case I pulled about an inch down from the trans tunnel and then worked it in as I went to the door channel.


After I was done I used some liner spray to seal it all up. Not sure if I would have done this again as this stuff smelled horrible, was extremely flammable while drying, and messy. Tape off ANYWHERE you don't want this stuff to end up including bolt holes!

Now that I had let this dry a couple days and tit was time to start installing the amps and fuse block so I could finally start somewhat buttoning this up.

Passengers side is a bit tight but everything does fit and does work pretty well, not sure if I had it to do over again if I would change anything but I wasn't making any changes at this point!


Everything laid out and working but not buttoned up quite yet. I'm still waiting on a 25' composite/RCA cable to run from the new head unit back to the rear subs so I'll have all the needed wires for future improvements like a backup camera and what not.  The Clarion head unit was a really good deal from Crutchfield for $109 delivered and I found the BT adapter from ebay for $38. I'm sure a double din upgrade is coming someday but for now I'm happy with how everything sounds. The "Blaupunkts" will probably be replaced soon with some decent Polks or Infinity's as I'd like to go 6.5" in the front doors and 5.25" in the rear doors but we'll see. Since I'm such a cheap SOB I'll probably wait until I see something on the Crutchfield outlet store that I can no longer resist!

I've since screwed the stereo in so it wouldn't fall out, buttoned up the wires on the floor and put the carpet back in along with the drivers seat and middle passenger seat. Hopefully this weekend I'll get the front pass and drivers middle seat recovered with Sean's kit and with any luck have it done before the first snow.
The rear subs/amp/subox is an entire story in itself but here it goes. Back in November of 2011 Best Buy had a special on subs, they were on sale and if you bought on you were eligble for a free sub cabinet and free delivery for both. I did a total of 4 orders the first two I did Kicker 12" subs because they were on sale for half price @ $49, with each one I ordered a free dual 12" sub cabinet, the most expensive one @ $179 The last two orders I got some nice Alpine 10" subs on sale for $69 from $125 each and again ordered the same dual 12" cabinet. So I now had 4 subs and 4 dual cabinets. 
I put up a craigslist ad and and sold the 2 Kicker 12" subs with one of the dual 12" cabinets for $150,
I then sold each of the remaining three cabinets for $75 each, this netted me $275, backing out $140 for the Alpines I was still ahead $135 so I found a Kenwood mono amp on Crutchfield outlet for $99 and this case from Amazon for $33.81 delievered. I know it was insane, I have NO idea how they shipped this cabinet for free or how they even got it over hear from China for that but it was made for some model of supercab Ford pickup and the measurements would fit in the cruiser so I didn't delay and snatched it up.
This makes my entire rear setup free, which makes it sound all the better! For those doubters and haters I have posted screen shots of my amazon and best buy invoices!

I forgot to add that before this was done I replaced all 4 shocks with Rancho 9000's and love them!


 Subbox from Amazon


 Sony Amps from Sony Outlet


Yet to come is the Ironman 4x4 front bumper and Engo 10K winch install and the Slee skid plate.